
The glass globe or shade on your Harbor Breeze ceiling fan’s light kit does more than just cover the bulbs; it shapes the light, contributes significantly to the fixture’s style, and protects the bulbs. While these components are fairly simple, they can encounter issues over time – becoming dirty or cloudy, getting accidentally cracked or broken, or perhaps loosening due to fan vibrations. You might also simply want to replace a globe to refresh the fan’s appearance.
This guide is designed to help you address common problems related to Harbor Breeze ceiling fan light globes. We’ll cover effective cleaning methods, what to do if your globe is damaged, and provide guidance on how to find and select a suitable replacement globe when necessary.
Finding an exact, official Harbor Breeze branded replacement globe can sometimes be difficult, particularly outside of North America where the brand is primarily sold (including here in Pakistan). Therefore, a key focus of this guide will be on understanding how to measure your existing globe’s fitter (the part that attaches to the fan) and identify the correct type, enabling you to find a compatible universal replacement globe from local lighting stores or accessible online marketplaces.
Common Types and Styles of Ceiling Fan Globes
Ceiling fan light covers, commonly called globes or shades, play a significant role in both the aesthetics of your Harbor Breeze fan and the quality of light it produces. They are available in various materials, finishes, and shapes, each offering different benefits in terms of durability, light diffusion, and style. Understanding these options can help when choosing a replacement or upgrading.
Here’s a look at common materials and finishes and their typical characteristics:
| Material | Common Finishes/Types | Light Effect | Key Characteristics |
| Glass | Clear | Bright, direct light; bulb is visible | Classic look; allows maximum light; can create glare; fragile |
| Frosted / Etched | Soft, evenly diffused light; hides bulb | Reduces glare; very common; still breakable | |
| Alabaster / Swirled | Soft, diffused light with subtle texture | Elegant appearance; hides bulb; breakable | |
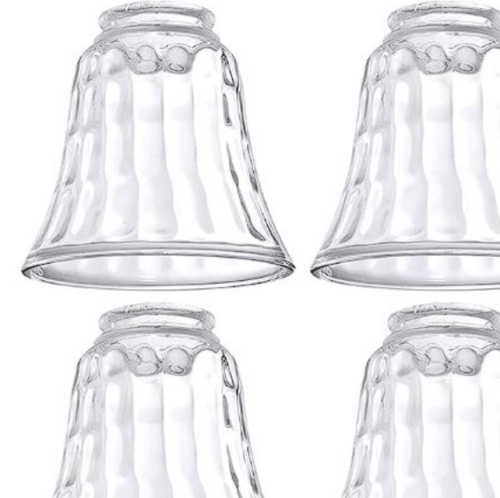
| Seeded / Hammered | Diffused light with distinct texture | Adds visual interest; hides bulb somewhat; breakable | |
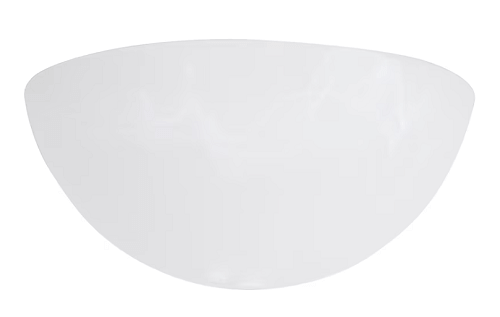
| Plastic/Acrylic | Opal / White | Evenly diffused, soft glow; hides bulb | Durable, shatter-resistant; lightweight; often affordable |
| Clear / Translucent | Brighter than opal; bulb may be visible | Durable; lightweight; practical | |
| Textured / Prismatic | Diffuses light through patterns | Durable; lightweight; can hide bulb effectively |
Material Considerations:
- Glass globes offer a classic look and excellent light clarity (if clear) but are fragile and can break if dropped or hit.
- Plastic and Acrylic globes are much more durable, lightweight, and less likely to shatter, making them a safer option, especially in homes with children or pets, or in active areas. While very functional, some may find they lack the premium feel of glass.
Common Shapes:
Beyond the material, globes come in various common shapes like simple spheres (Globes), wide shallow dishes (Bowls usually covering multiple bulbs), vintage-inspired Schoolhouse shapes, or as Individual Shades used in multi-light arm fixtures. The shape influences how broadly the light is distributed.
When choosing replacement parts, consider the material’s durability, the desired light effect (bright vs. diffused), the shape that fits your fan’s style, and most importantly, the correct fitter size to ensure it attaches properly to your Harbor Breeze light kit.
Common Problems with Ceiling Fan Globes & Solutions
The glass globe or shade on your Harbor Breeze ceiling fan’s light kit plays a vital role: it softens and diffuses light, protects the bulbs, and significantly contributes to the fan’s overall style. While generally durable, these globes can become dirty, get accidentally cracked or broken, loosen over time due to vibration, or you might simply want to replace one to update the look.
This guide addresses common issues encountered with ceiling fan light globes, specifically in the context of Harbor Breeze fans. We’ll cover cleaning tips, how to deal with damage, and most importantly, how to find and choose a compatible replacement globe if needed.
Problem: Uneven Light Distribution or Shadows
- Possible Cause: The most likely reason is that the globe isn’t seated correctly or is slightly tilted on the light fitter where it attaches to the fan.
- Solution: Power OFF at the breaker. Carefully loosen the screws or retaining mechanism holding the globe. Re-center the globe on the fitter and ensure it’s sitting level and evenly. Retighten the retainers snugly but gently to avoid cracking glass.
Problem: Condensation Inside the Globe
- Possible Causes: Using an indoor-rated fan/light kit in a damp area (bathroom, humid climate); temperature differences causing moisture to condense inside.
- Solution:
- Power OFF. Carefully remove the globe.
- Thoroughly wipe the inside of the globe dry with a clean, soft cloth.
- Check Fan Rating: Ensure your Harbor Breeze fan and light kit are appropriately damp-rated or wet-rated if installed in a location prone to moisture. Using a dry-rated fan in damp conditions is unsafe and causes these issues.
- Reinstall Globe: Ensure the globe makes a proper seal against the fitter (check for intact gaskets if applicable).
- Optional: For persistent minor condensation in suitable locations, sometimes placing a small desiccant packet (like silica gel) inside the fitter (away from bulbs/wiring) can help absorb trapped moisture, but ensure it doesn’t touch hot bulbs.
Problem: Globe is Yellowed or Discolored
- Possible Causes: Primarily affects older plastic globes due to prolonged exposure to UV light (sunlight or even bulb heat) which degrades the material. Certain types of smoke or vapor buildup can also stain globes.
- Solution:
- Cleaning: First, try cleaning thoroughly (Power OFF, remove globe) with a soft cloth and mild soap and water to remove surface stains like grease or smoke residue. Avoid abrasive cleaners (like scouring powders) or harsh solvents, as they can permanently scratch or cloud plastic and some glass finishes.
- Irreversible Yellowing: Deep yellowing within the plastic material itself due to age and UV exposure is usually not reversible with cleaning.
- Replacement: The best solution for significant, irreversible yellowing or discoloration is to replace the globe. Consider glass or high-quality acrylic replacements, which are less prone to yellowing.
Problem: Difficulty Cleaning / Heavy Dust & Grime
- Possible Cause: Normal accumulation of household dust, grease (especially near kitchens), or other airborne particles clinging to the globe surface.
- Solution:
- Regular Dusting: Power off fan. Use a long-handled duster or microfiber cloth to regularly wipe the outside of the globe and the fan blades.
- Thorough Washing: For heavier grime, Power OFF, carefully remove the globe. Wash it gently inside and out using warm water and a small amount of mild dish soap. Rinse completely and allow it to air dry thoroughly before reinstalling to prevent trapping moisture. Wipe down bulbs (when cool) with a dry microfiber cloth.
Problem: Finding a Compatible Replacement Globe
- Possible Causes: Original globe broken or outdated; difficulty finding exact Harbor Breeze branded replacement, even in the US, for older models; uncertainty about universal globe fit.
- Solution: Focus on Fitment:
- Identify Fitter Type: Carefully examine how your old globe attached. Common types include:
- Threaded Neck: The globe has threads that screw directly into the light fitter base. Measure the thread diameter.
- Neckless (Straight Edge): The globe has a smooth, straight opening, held in place by small set screws tightening against the side of the glass/plastic from the fitter. Measure the exact OUTER diameter of the globe’s opening needed.
- Lipped Fitter: The globe has a distinct rim or lip around the opening that rests inside the fitter base and is secured by set screws below the lip or a retaining ring/cap. Measure the exact OUTER diameter of this lip.
- Measure Dimensions: Note the old globe’s overall height and widest diameter to ensure a new one fits aesthetically and doesn’t interfere with pull chains or the ceiling.
- Check Bulb Clearance: Ensure the replacement globe is large enough internally to accommodate the size and number of bulbs used in your light kit without the bulbs touching them.
- Identify Fitter Type: Carefully examine how your old globe attached. Common types include:
Where to Purchase Replacement Harbor Breeze Globes
If your Harbor Breeze fan’s light globe is broken, outdated, or missing, you’ll need to find a compatible replacement. Here are the primary sources to check within the US market:
- Lowe’s (Lowes.com & Physical Stores): As Harbor Breeze is mainly their brand, Lowe’s is the first place to look for potential official, model-specific replacement globes. Search Lowes.com using your fan’s model number, or contact Lowe’s US customer support for parts inquiries. In-store selection may be limited.
- Amazon.com / eBay.com: These online marketplaces feature a huge variety of universal replacement globes from numerous third-party sellers. Success here depends heavily on knowing your required fitter type and measurements (see FAQ below).
- Specialized Online Lighting & Fan Parts Retailers: Several US-based websites focus specifically on lighting components and ceiling fan parts. They often have a wide selection of replacement glass shades and globes in various fitter sizes and styles.
- Other Home Improvement & Lighting Stores: Retailers like Home Depot, Menards, or dedicated lighting showrooms may also carry universal replacement globes compatible with various fan brands.
Important: When purchasing a universal replacement globe, especially online, always double-check the product description for the exact fitter type, diameter measurement, and overall dimensions. Review the seller’s return policy in case of incompatibility.
Frequently Asked Questions (FAQ) about Fan Globes
Here are answers to common questions about replacing ceiling fan light globes:
Can I replace only the glass globe on my ceiling fan?
Yes, definitely. If the light kit fixture itself is working fine, you can usually replace just the glass globe or shade without needing to replace the entire light kit or fan. The most important part is ensuring the new globe has the correct fitter size and type to attach properly to your fan’s existing light fixture base.
What does ‘fitter size’ mean for a ceiling fan globe?
The “fitter” is the part of the globe’s opening that physically connects or attaches to the fan’s light fixture base. The “fitter size” usually refers to the diameter of this connection point. Common fitter types include:
- Threaded: Like a jar lid, screws onto threads on the fixture.
- Neckless (Straight): A smooth, straight edge held by set screws on the fixture base.
- Lipped: A distinct rim around the opening that sits inside the fixture base, often secured by screws or a cap. Knowing your fitter type and its precise diameter measurement is essential for finding a compatible replacement.
How do I measure for a replacement ceiling fan globe?
Getting the right fit requires accurate measurement. Here’s how:
- Safety First: Turn off power to the fan at the circuit breaker.
- Remove Old Globe: Carefully remove the existing globe (or what remains of it if broken).
- Identify Fitter Type: Determine how the globe attached (threaded, neckless with set screws, lipped).
- Measure Critical Dimension:
- For Threaded globes: Measure the outer diameter across the widest part of the threads.
- For Neckless (Straight) globes: Measure the outer diameter of the globe’s straight opening edge. (Alternatively, measure the inner diameter of the holder on the fan where the globe sits).
- For Lipped globes: Measure the outer diameter of the lip itself (the part that rests inside the fixture).
- Measure Overall Size: Note the globe’s approximate height and widest diameter to ensure the replacement looks proportional and allows enough space for the bulbs inside.
- Find Matching Replacement: Search for a new globe that explicitly lists the same fitter type and diameter measurement you recorded. A slight variance might be okay for some fitter types, but an exact match is usually best.